Whether you’ve been canning for decades or are just learning how to can for the first time, proper equipment in good condition is required to make safe, high quality canned foods at home. To save money, time, and frustration once the harvest is ready, plan ahead now for successful home canning all summer long.
If you’ve not yet purchased your needed equipment, there are two types of canners to consider: boiling water canners and pressure canners. A boiling water canner is used for canning acid or acidified foods like fruits, pickles, jams and jellies. Boiling water canners cost $15-$35, or can be assembled with a large stock pot, secure lid, and rack to keep jars off the bottom of the pot.
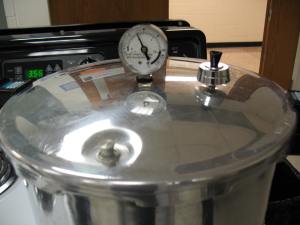
A pressure canner is what you’ll need for canning low acid foods such as vegetables, meats, fish, and poultry. Pressure canners are essential for safe canning of low acid foods. Temperatures inside pressure canners reach higher than in boiling water canners (240°F and above as compared to about 212°F). These high temperatures are necessary to kill the toxin–producing spores of the bacteria Clostridium botulinum.
You get to choose between two types of pressure canners: a dial gauge canner or a weighted gauge canner. The canners work the same way, but have different types of gauges to indicate the pressure inside the canner. Expect to spend $100-$150 or more on a pressure canner.
If you use a dial gauge canner, then it’s important to have it tested for accuracy before each canner season. Local hardware stores and your local Extension agent may be able to help you with this task. For either type of canner, check that the rubber gasket is flexible and soft, and if it is brittle, sticky, or cracked then replace it with a new gasket. Also check that any openings, like vent ports, are completely clean and open.
You’ll also need jars, lids, and ring bands. When getting started, new jars are a worthwhile investment (versus purchasing used jars from a yard sale or flea market) because very old jars may break under pressure and heat. Mason-type jars with two-piece self-sealing lids are recommended in USDA guidelines. Jars, with lids and ring bands, cost between $5-$17 per dozen depending on the brand and size. Look for manufacturer’s coupons, store specials and online discounts.
Once you have jars you’ll want to check them carefully before each use for cracks or chips, especially near the top sealing edge. Similarly, check ring bands for dents, bends and rust. Both jars and ring bands are reusable until they show these aforementioned signs of wear. Standard metal flat lids are designed for one use only, so discard any used lids and buy new flat lids.
In addition to standard cooking utensils like cutting boards and bowls, a jar funnel, jar lifter, lid wand, headspace tool, and bubble-freer are items that you will want to have handy for canning.
Lastly, find recipes and instructions for what you want to can. Specific kitchen equipment or ingredients could be needed to follow directions for food preparation. Reliable, up-to-date canning instructions are available at the NCHFP website, the USDA Complete Guide to Home Canning, So Easy to Preserve, or your county Extension office.
This entry is a modification of ‘Plan Ahead for Home Canning this Summer’ by Dr. Elizabeth Andress and contains information from ‘Cost of Preserving and Storing Food’ by Colorado State University Extension.


